
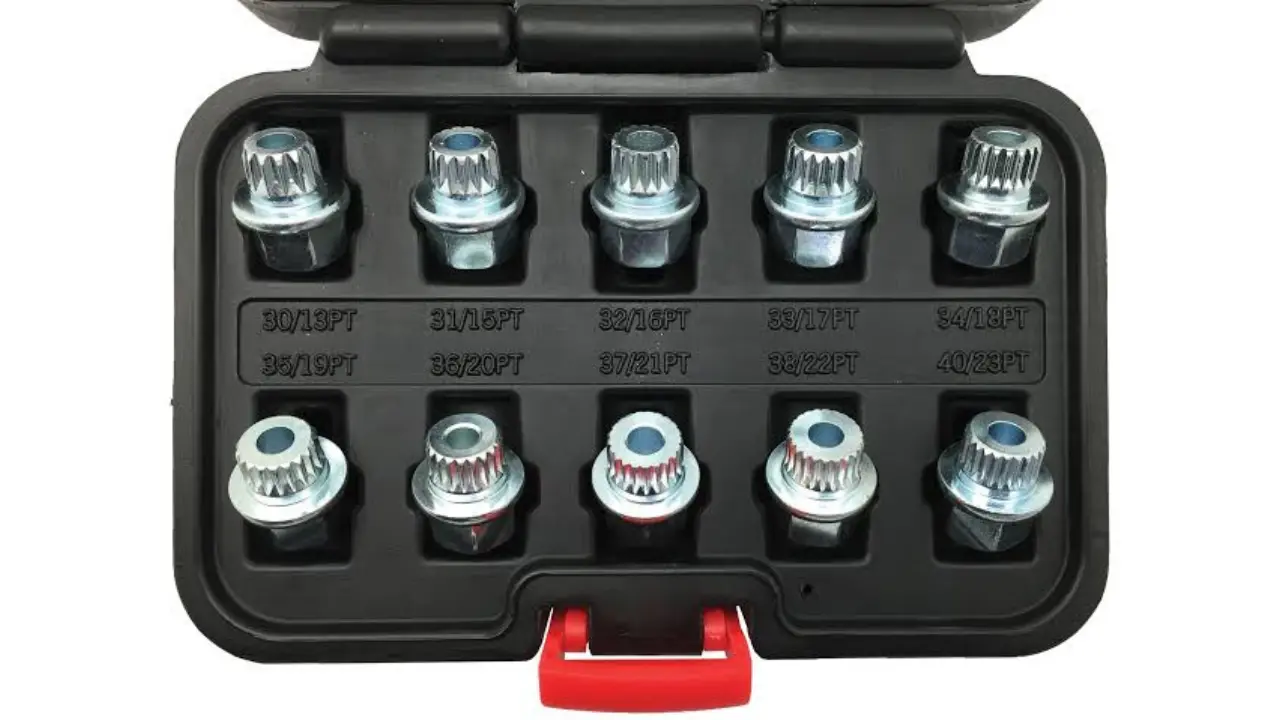
A locking wheel nut removal tool helps drivers remove security wheel nuts when the original key is lost, damaged, or no longer works. These special nuts protect alloy wheels from theft, but they can create a serious problem during a tyre change or wheel repair.
With the correct equipment and method, you can remove a locking nut without causing major damage to the alloy wheel, wheel hub, or stud. This guide explains how removal tools work, the main types available, safety steps, common mistakes, and when professional help is needed.
What Is a Locking Wheel Nut?
A locking wheel nut is a special fastener fitted to a vehicle’s wheel. Unlike a standard wheel nut, it has a unique pattern that requires a matching key or adapter.
Most vehicles have one locking nut on each wheel. The other nuts can normally be removed with a standard wheel brace or socket.
Car manufacturers and wheel accessory brands use many different locking designs. Therefore, a key from one vehicle may not work with another vehicle, even when the nuts look similar.
Locking nuts provide useful protection against wheel theft. However, they become difficult to remove when the key is missing, broken, worn, or damaged.
What Is a Locking Wheel Nut Removal Tool?
A locking wheel nut removal tool is a special socket, extractor, or removal device used when the original locking key cannot loosen the nut. It grips the outside of the nut or cuts into its surface to create enough turning force.
Many extractor sockets have reverse spiral threads. As the socket turns anticlockwise, the internal threads bite deeper into the locking nut.
Other systems use hammer-on sockets, impact extractors, drilling equipment, shaped adapters, or welding methods. The correct option depends on the condition and position of the nut.
A simple extractor may work on an exposed nut. However, a deeply recessed or badly damaged nut may require specialist equipment.
Why Drivers May Need a Removal Tool
The most common reason is a missing wheel nut key. Drivers often keep the key in the glove box, boot, spare wheel compartment, or factory tool kit.
The key may also disappear during a tyre replacement, brake repair, or vehicle service. In some cases, a previous owner may sell the vehicle without providing the key.
A damaged key is another common problem. Low-quality keys can crack when a technician applies too much pressure.
The locking nut may also become rounded because someone used the wrong adapter. Rust and corrosion can make the nut even harder to loosen.
Drivers may need a removal tool in the following situations:
- The original locking key is missing.
- The key pattern has become worn.
- The locking nut has rounded edges.
- The nut has become heavily corroded.
- The original adapter has cracked.
- The locking nut was over-tightened.
- The nut spins without becoming loose.
Main Types of Removal Tools
Different tools work better in different situations. Some tools grip the outside of the locking nut, while others remove material from the nut.
| Tool Type | Best Use | Main Benefit | Possible Risk |
|---|---|---|---|
| Spiral extractor socket | Rounded or exposed nuts | Simple and widely available | Can damage the nut surface |
| Universal removal kit | Common locking nut designs | Includes several socket sizes | May not fit rare patterns |
| Hammer-on socket | Slightly damaged nuts | Creates a strong grip | May mark the alloy wheel |
| Impact extractor | Very tight wheel nuts | Provides powerful turning force | Can damage the wheel stud |
| Drill-based system | Severely damaged nuts | Works when gripping fails | Requires skill and control |
| Welding method | Difficult professional jobs | Creates a solid removal point | Heat may damage the wheel finish |
A good extractor must match the size and shape of the nut. A poorly fitted socket can slip and damage the surrounding alloy.
How to Choose the Correct Removal Tool
Before buying or using a locking wheel nut removal tool, inspect the position and shape of the nut. Some wheel nuts have an exposed outer edge that an extractor can grip easily.
Other nuts sit deep inside narrow wheel holes. In that situation, the extractor must be long and thin enough to reach the nut without touching the wheel.
Measure the outer diameter of the nut when possible. The extractor normally needs to be slightly smaller so its spiral edges can bite into the metal.
A socket that is too large may spin around the nut. A socket that is too small may not fit over it.
You should also check whether the tool supports manual or impact use. Some extractor sockets can crack when used with a powerful impact wrench.
Choose tools made from hardened steel. Strong steel provides better grip and reduces the risk of the extractor breaking under pressure.
Jema Donahue Release Date: What Happened to Her?
How to Use a Locking Wheel Nut Removal Tool
Park the vehicle on firm and level ground before starting. Apply the parking brake and place the transmission in park or first gear.
Do not lift the vehicle before loosening the wheel nuts. Keeping the tyre on the ground prevents the wheel from turning while you apply pressure.
Step 1: Check for the Original Key
Search the glove box, door pockets, boot storage, spare wheel area, and factory tool bag. The original key may save time and prevent damage.
You should also check the vehicle documents. Some locking nut sets include a key code that allows you to order a replacement.
Step 2: Clean the Locking Nut
Remove dust, rust, and small stones from the nut. Use a small brush, cloth, or compressed air if available.
A clean surface allows the extractor to sit more evenly. You may apply a small amount of penetrating oil around the nut.
Avoid spraying too much oil near the brake disc and brake pads.
Max B Release Date: Why is He in Jail?
Step 3: Select the Correct Extractor
Choose an extractor that fits tightly over the locking nut. It should not move freely from side to side.
Place the socket straight against the nut. A crooked socket may slip or damage the wheel.
Step 4: Tap the Extractor into Place
Use a hammer to tap the extractor carefully onto the nut. Apply controlled and accurate blows rather than hitting it with extreme force.
The socket should grip the nut firmly. Protect the surrounding alloy with masking tape or a thin plastic cover where possible.
Step 5: Loosen the Nut
Attach a strong breaker bar to the extractor. Turn it anticlockwise using slow and steady pressure.
Keep the breaker bar straight. Sideways force may bend the wheel stud or cause the socket to slip.
Once the nut starts moving, continue turning it slowly until it comes away from the wheel.
Step 6: Remove the Nut from the Socket
The removed nut may remain tightly fixed inside the extractor. Place the socket in a vice and use a punch or removal pin to push the nut out.
Some tool kits include a special pin for this purpose. Follow the manufacturer’s instructions to avoid damaging the extractor.
Step 7: Inspect the Wheel Stud
Check the threads on the wheel stud after removal. Look for bending, rust, broken threads, or other signs of damage.
Replace a damaged stud before driving. A weak stud may fail and affect wheel safety.
Important Safety Tips
Always wear safety glasses and protective gloves. Small pieces of metal can break away while the extractor cuts into the nut.
Use a breaker bar instead of a weak ratchet. Ratchets may fail when they receive more force than they were designed to handle.
Keep the extractor straight throughout the removal process. An angled socket can slip and scratch the wheel.
Do not apply maximum force immediately. If the nut does not move, stop and check whether the socket is gripping correctly.
Avoid using heat unless you have professional training. High heat may damage:
- Wheel paint and protective coatings
- Brake discs and brake pads
- Wheel bearings
- Rubber seals
- Tyres
- Nearby suspension parts
Never place your hands or feet under a raised vehicle unless it is supported by approved axle stands.
Can a Locking Nut Be Removed Without Damage?
It is often possible to protect the wheel and stud during removal. However, the locking nut itself will usually become damaged.
The extractor cuts or bites into the outer surface of the nut. This means you should not reuse the removed locking nut.
A clean and exposed nut is easier to remove safely. A deeply recessed, rounded, spinning, or heavily corroded nut creates a higher risk of wheel damage.
Using a locking wheel nut removal tool carefully is safer than forcing random sockets onto the nut. Improvised tools can slip and leave deep marks on the alloy.
Common Mistakes to Avoid
One of the biggest mistakes is choosing the wrong extractor size. A loose socket may spin and polish the surface of the nut.
This makes the nut smoother and more difficult to grip during the next attempt.
Another mistake is using an impact wrench too early. Powerful impact force can crack the extractor or damage the wheel stud.
Drivers also forget to search for the original key. Always check the vehicle carefully before using destructive removal methods.
Do not hammer directly against the alloy wheel. Control the striking point and protect the surrounding surface.
Avoid drilling the nut unless you understand the position of the wheel stud. A drill bit can move away from the centre and damage expensive wheel parts.
You should also avoid using a long metal pipe to increase leverage. Extreme force may snap the stud instead of loosening the nut.
DIY Removal Versus Professional Removal
DIY removal may be suitable when the nut is exposed, lightly damaged, and easy to reach. A quality extractor kit can help home mechanics handle basic cases.
However, professional help is often safer when the nut is:
- Deeply recessed inside the wheel
- Completely rounded
- Spinning freely
- Heavily rusted
- Over-tightened
- Close to a delicate alloy finish
- Already damaged by previous attempts
A trained technician may use specialist sockets, drilling guides, welding equipment, or precision cutting tools. These methods require proper control and experience.
Professional removal may cost more than buying a basic tool, but it can reduce the risk of damaging an expensive alloy wheel.
What Does Removal Normally Cost?
The cost depends on the type of tool, number of locking nuts, level of damage, and vehicle design.
A basic extractor socket is usually affordable. A complete universal kit costs more because it contains several socket sizes and shapes.
Professional services may charge per nut or per vehicle. A simple extraction can be completed quickly, while a drilled or welded nut may require more labour.
Before selecting the cheapest option, consider the value of the wheel. A poor-quality tool may save a small amount of money but cause costly alloy damage.
How to Prevent Future Problems
Store the locking key in the same place after every use. The glove box, boot tool kit, and spare wheel compartment are common storage areas.
Tell tyre technicians where the key is located. Before leaving the workshop, check that they returned it to the vehicle.
Do not allow locking nuts to be over-tightened. Use a torque wrench and follow the vehicle manufacturer’s recommended torque setting.
Clean the key and locking pattern from time to time. Dirt can prevent the key from sitting fully inside the nut.
Keep the key code or original packaging in a safe place at home. Some manufacturers can provide a replacement key when you give them the correct code.
It may also help to photograph the key pattern and packaging. The photograph cannot remove the nut, but it may help identify the correct replacement.
When Should You Replace the Locking Nuts?
Replace the locking set when the key becomes cracked, worn, loose, or difficult to fit. A weak key may break during an emergency tyre change.
You should also replace locking nuts that show signs of rust, rounded edges, or damaged patterns.
Make sure the replacement set matches the vehicle. Check the thread size, thread pitch, seat shape, and nut length.
An incorrect wheel nut may damage the wheel or become loose while driving. Ask a qualified parts supplier when you are unsure about compatibility.
Frequently Asked Questions
Can I remove a locking wheel nut with normal pliers?
Normal pliers usually cannot provide enough grip or turning force. They may also damage the nut and make professional removal more difficult.
Will an extractor damage my alloy wheel?
A correctly fitted extractor should not damage the wheel. However, careless hammering, slipping tools, and poor socket sizes can scratch the alloy.
Can I drive with one wheel nut missing?
You should not continue normal driving with a wheel nut missing. Fit a correct replacement and have the wheel checked as soon as possible.
Can every locking nut be removed with an extractor?
No. Some recessed, spinning, or heavily damaged nuts require drilling, welding, or specialist removal equipment.
Should I replace all four locking nuts?
It is normally better to replace the complete set. This gives you one matching key and consistent protection across all four wheels.
Conclusion
A locking wheel nut removal tool provides a practical solution when the original key is missing, damaged, or unable to turn the nut. The right extractor can restore access to the wheel without causing unnecessary damage.
Choose the correct socket size, clean the nut, work slowly, and keep the tool straight. Avoid extreme force, uncontrolled drilling, and unsuitable impact tools.
Simple cases may be suitable for careful DIY removal. However, deeply recessed, spinning, or badly damaged nuts should be handled by an experienced technician.